

I get it. When you’ve been taught since you were a wee girl to never put your makeup brushes in water, it can be really challenging to believe that this method might actually be the fastest, easiest and best way to clean your brushes?
But, as somebody who’s been shake-cleaning my brushes in a sports bottle since 2005 — almost 10 years — I insist that’s the case.
In fact, when I started shaking my brushes clean a decade ago, I figured I would just replace my brushes if they were damaged. I simply valued by time and face more than my brushes. That’s because, for me, keeping my brushes clean was imperative to keep acne away.
But a funny thing happened during all those years of shake-cleaning: my brushes were never damaged. When I finally decided to bring My Brush Betty to market in 2013, I actually had to go back and investigate why it worked so well, despite all the conventional wisdom about never submerging your brushes in water.
What I discovered was a lot of information that showed shake-cleaning is probably the best way to get your brushes truly, thoroughly cleaned to the cuticle of the brush hair.
Understanding how things are made!
I learned that, contrary to conventional wisdom, brush ferrules are made with non-ferrous metals, such as aluminum, brass and nickel, which don’t contain iron and cannot rust. I also learned brush manufacturers commonly use non-water-soluble glue, usually an epoxy, which is water resistant, to assemble brushes. I also learned that most of what holds brush hair in place isn’t just the glue anyway, but also string or wire, and crimping. And most of the glue in a makeup brush is actually used to connect the handle to the ferrule.
I also learned, after studying tons of videos and photos of women washing brushes all over YouTube and Pinterest, that women are getting their brushes plenty wet when they hand wash them anyway — because the process takes so long and it’s pretty difficult to not get water up under the ferrule during hand-washing.
Actually, a lot of women out there, like this one below, are simply giving up and throwing their brushes into sinks full of water anyway … which is honestly a terrible idea. That’s because SOAKING brushes for long periods of time can actually damage the glue, because, while it’s water-resistant, it’s not 100% waterproof.
I love doing my makeup but I hate cleaning my brushes #lazyass #longoverdue pic.twitter.com/Cwa85m7JHi
— Anelys Perez (@anelysenid) May 16, 2013
Protecting Your Brushes
The very best thing you can do to protect your brushes is:
1.) Don’t soak them for long periods of time in water or anything wet. The glue, as I mentioned above, is water-resistant but not 100% waterproof.
2.) Keep them out of extreme heat and extreme cold. And I don’t just mean hot water and cold water. I also mean hot weather and cold temperatures, too. It’s just as damaging to leave your brushes locked in a hot car all day as in a freezing cold car.
That’s because the non-water soluble glue, or epoxy, used in a makeup brush assembly can liquify, or get gooey, when hot and contract, or shrink up, when cold, which draws the bond away from the thing it’s sticking to, like the inside wall of the ferrule. So extreme temperatures are one of the easiest ways to damage the integrity of your brushes.
3.) Don’t be foolish and expose your brushes to chemicals that might break down epoxy.
Try it out for yourself!
So, as long as you follow the directions, My Brush Betty simply works too fast to damage your brushes.
And here’s the good news: You don’t have to just take my word for it.
Here’s how I built my own My Brush Betty years ago:
- Buy a wide sports drink bottle, like this one for $6.99.
- Buy a cheap-o hairbrush with bristles embedded in a rubber pad, like this one. You can find a much similar, cheaper option at your local CVS.
- Now you will need something sharp, like very sharp scissors or a box cutter.
- Cut the rubber bristle pad out of the hair brush, taking care to cut out the widest pattern you can, all the way to the edge if possible. In some cases, you can actually just pull it out.
- Get a white piece of paper and set your bottle on top of it. Trace the shape of the bottom with a pencil. Then, cut out this round pattern with a pair of scissors.
- Now, you’re going to want to cut your bristle pad in the same shape as this pattern. You can do this by holding the pattern along the bottom of the bristle pad and cutting to make the shapes match. Then, remove the pattern and just go along the edge of the bristle pad one more time with your scissors, to trim another tiny bit of material off. This will make the bristle pad just a hair smaller than the pattern, to account for the outside wall of the bottle.
- Now, make sure the bristle pad fits int0 the bottom of the bottle and make any final trims, if necessary.
- We’re in the hot glue phase now, where you will hot glue your bristle pad to the inside bottom of the bottle. Use a healthy amount of hot glue, and try to use a non-water-soluble glue because – duh – you’ll be putting water in this thing.
- Wait for your homemade My Brush Betty to dry THOROUGHLY, and you are good to test it out for yourself! Make sure to follow the directions on this site. That means using lukewarm water and shake-cleaning for one full minute, followed by two quick rinse cycles.
- Finally, in the upper cap, you’ll want to make sure you have a spongy liner of some sort as your brush handles will be bumping into the inner lid. If the lid doesn’t already have a liner, you can seriously just get some foam circles at a craft store or something.
Very quickly, you will determine that, yes, this baby really works!
After a couple of uses, you will also see that one of the challenging parts about this homemade contraption is getting the rubber bristle pad to stick to the bottom of the bottle and stay there with repeated use. … When you glue rubber to smooth plastic, and the bottom of the bristle pad is sometimes porous, it can be challenging to get a really strong bond.
This is also one of the reasons I decided to make a real My Brush Betty for the marketplace. It was just time to do this thing right …
The My Brush Betty container has been designed so you’ll never have problems getting the bristles to stick to the bottom of the container. Plus, it’s pretty!
The Drying Mat
There’s also the issue of the mat.
As you can see from the photos under my photo at the top of the page, I used a rubber pad designed as a clothing iron rest to dry my brushes.
I also redesigned and improved upon this concept to have an angled mat that would roll up and store in the bottle.
You can find some rubber mats online, but most of them are flat, not angled, but you can certainly find something close …
In Conclusion
I’ve tried to do the hard work for you, by putting together a product built for the specific purpose of cleaning and drying makeup brushes.
A lot of thought has gone into the different components to improve upon the homemade version of My Brush Betty.
Don’t knock it ’til you shake it!
You’ll be astonished at how easy it is!
Happy Shaking!

By Sarah A. Webster
Founder
My Brush Betty
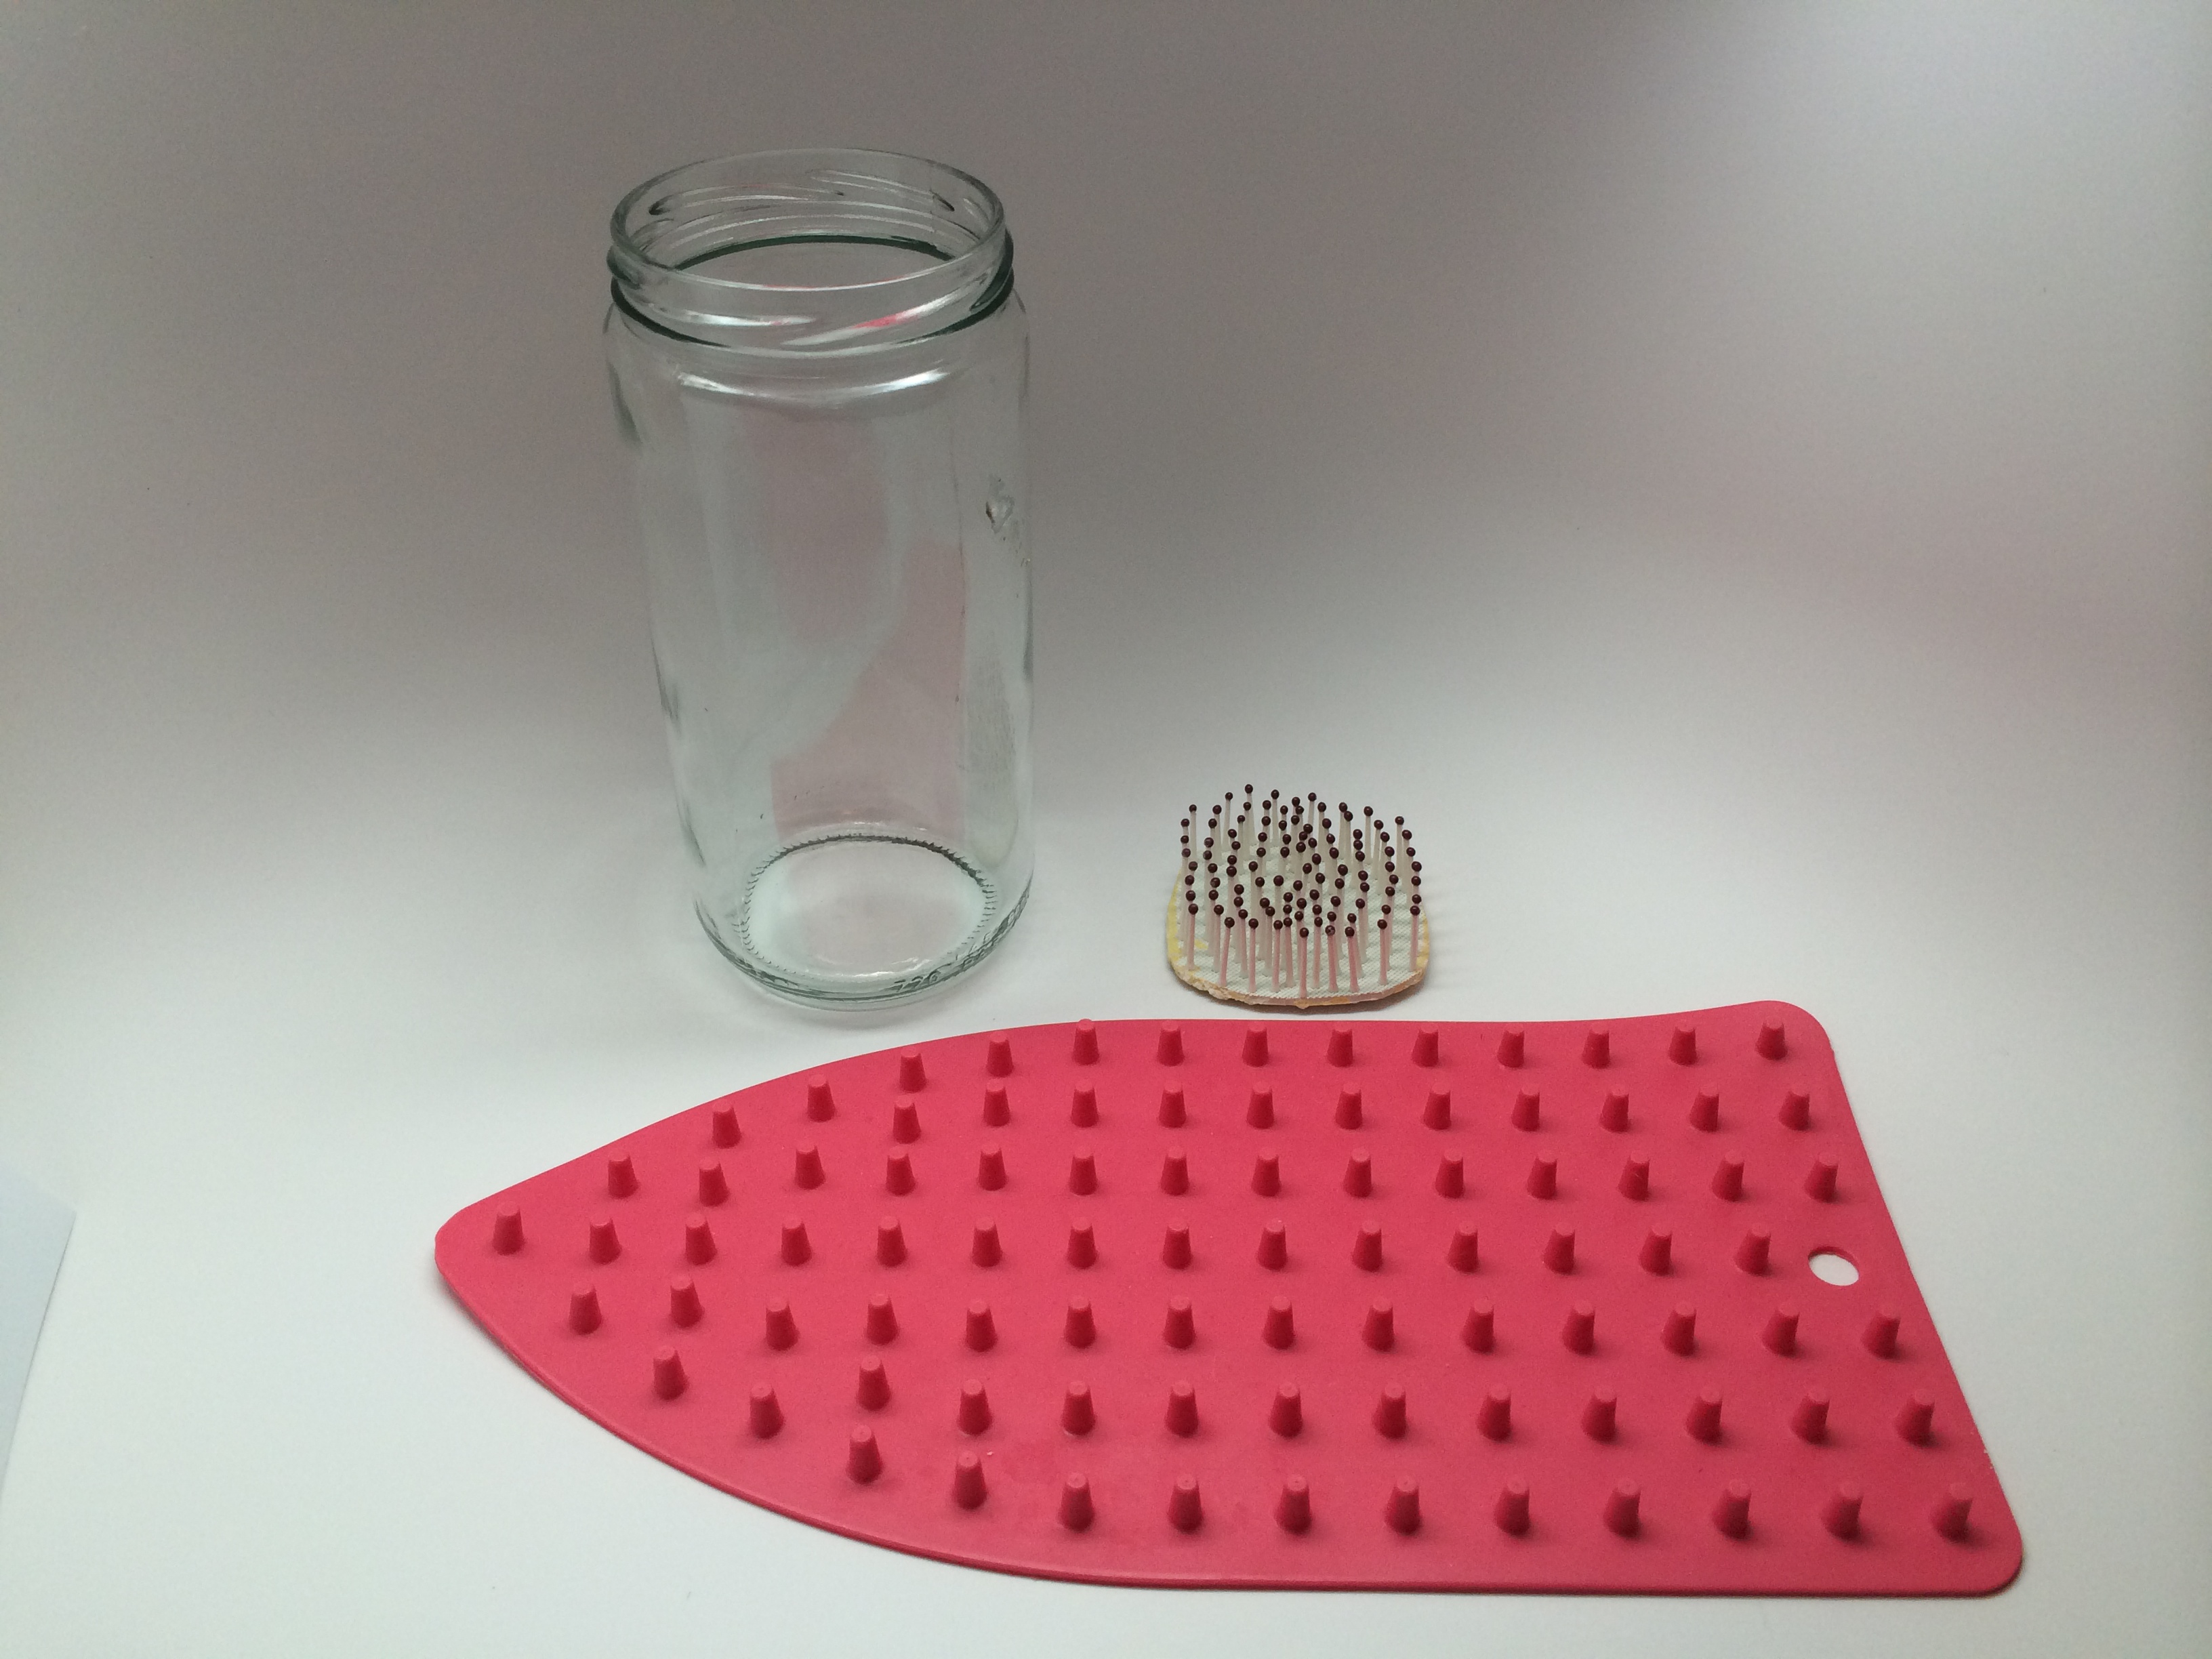
Here is my old homemade My Brush Betty cleaning kit. I’m showing it with a glass bottle here just so you can see inside clearly. I always used a plastic bottle. … Over the years, I tried out many bottle-bristle combinations, but I finally decided I need a purpose-built device to do this right.

Again, I’m just using a glass bottle here so you can see the concept. I always used a plastic bottle over the years, although I tried many different ones … I also used this ironing mat to elevate and dry my brushes.
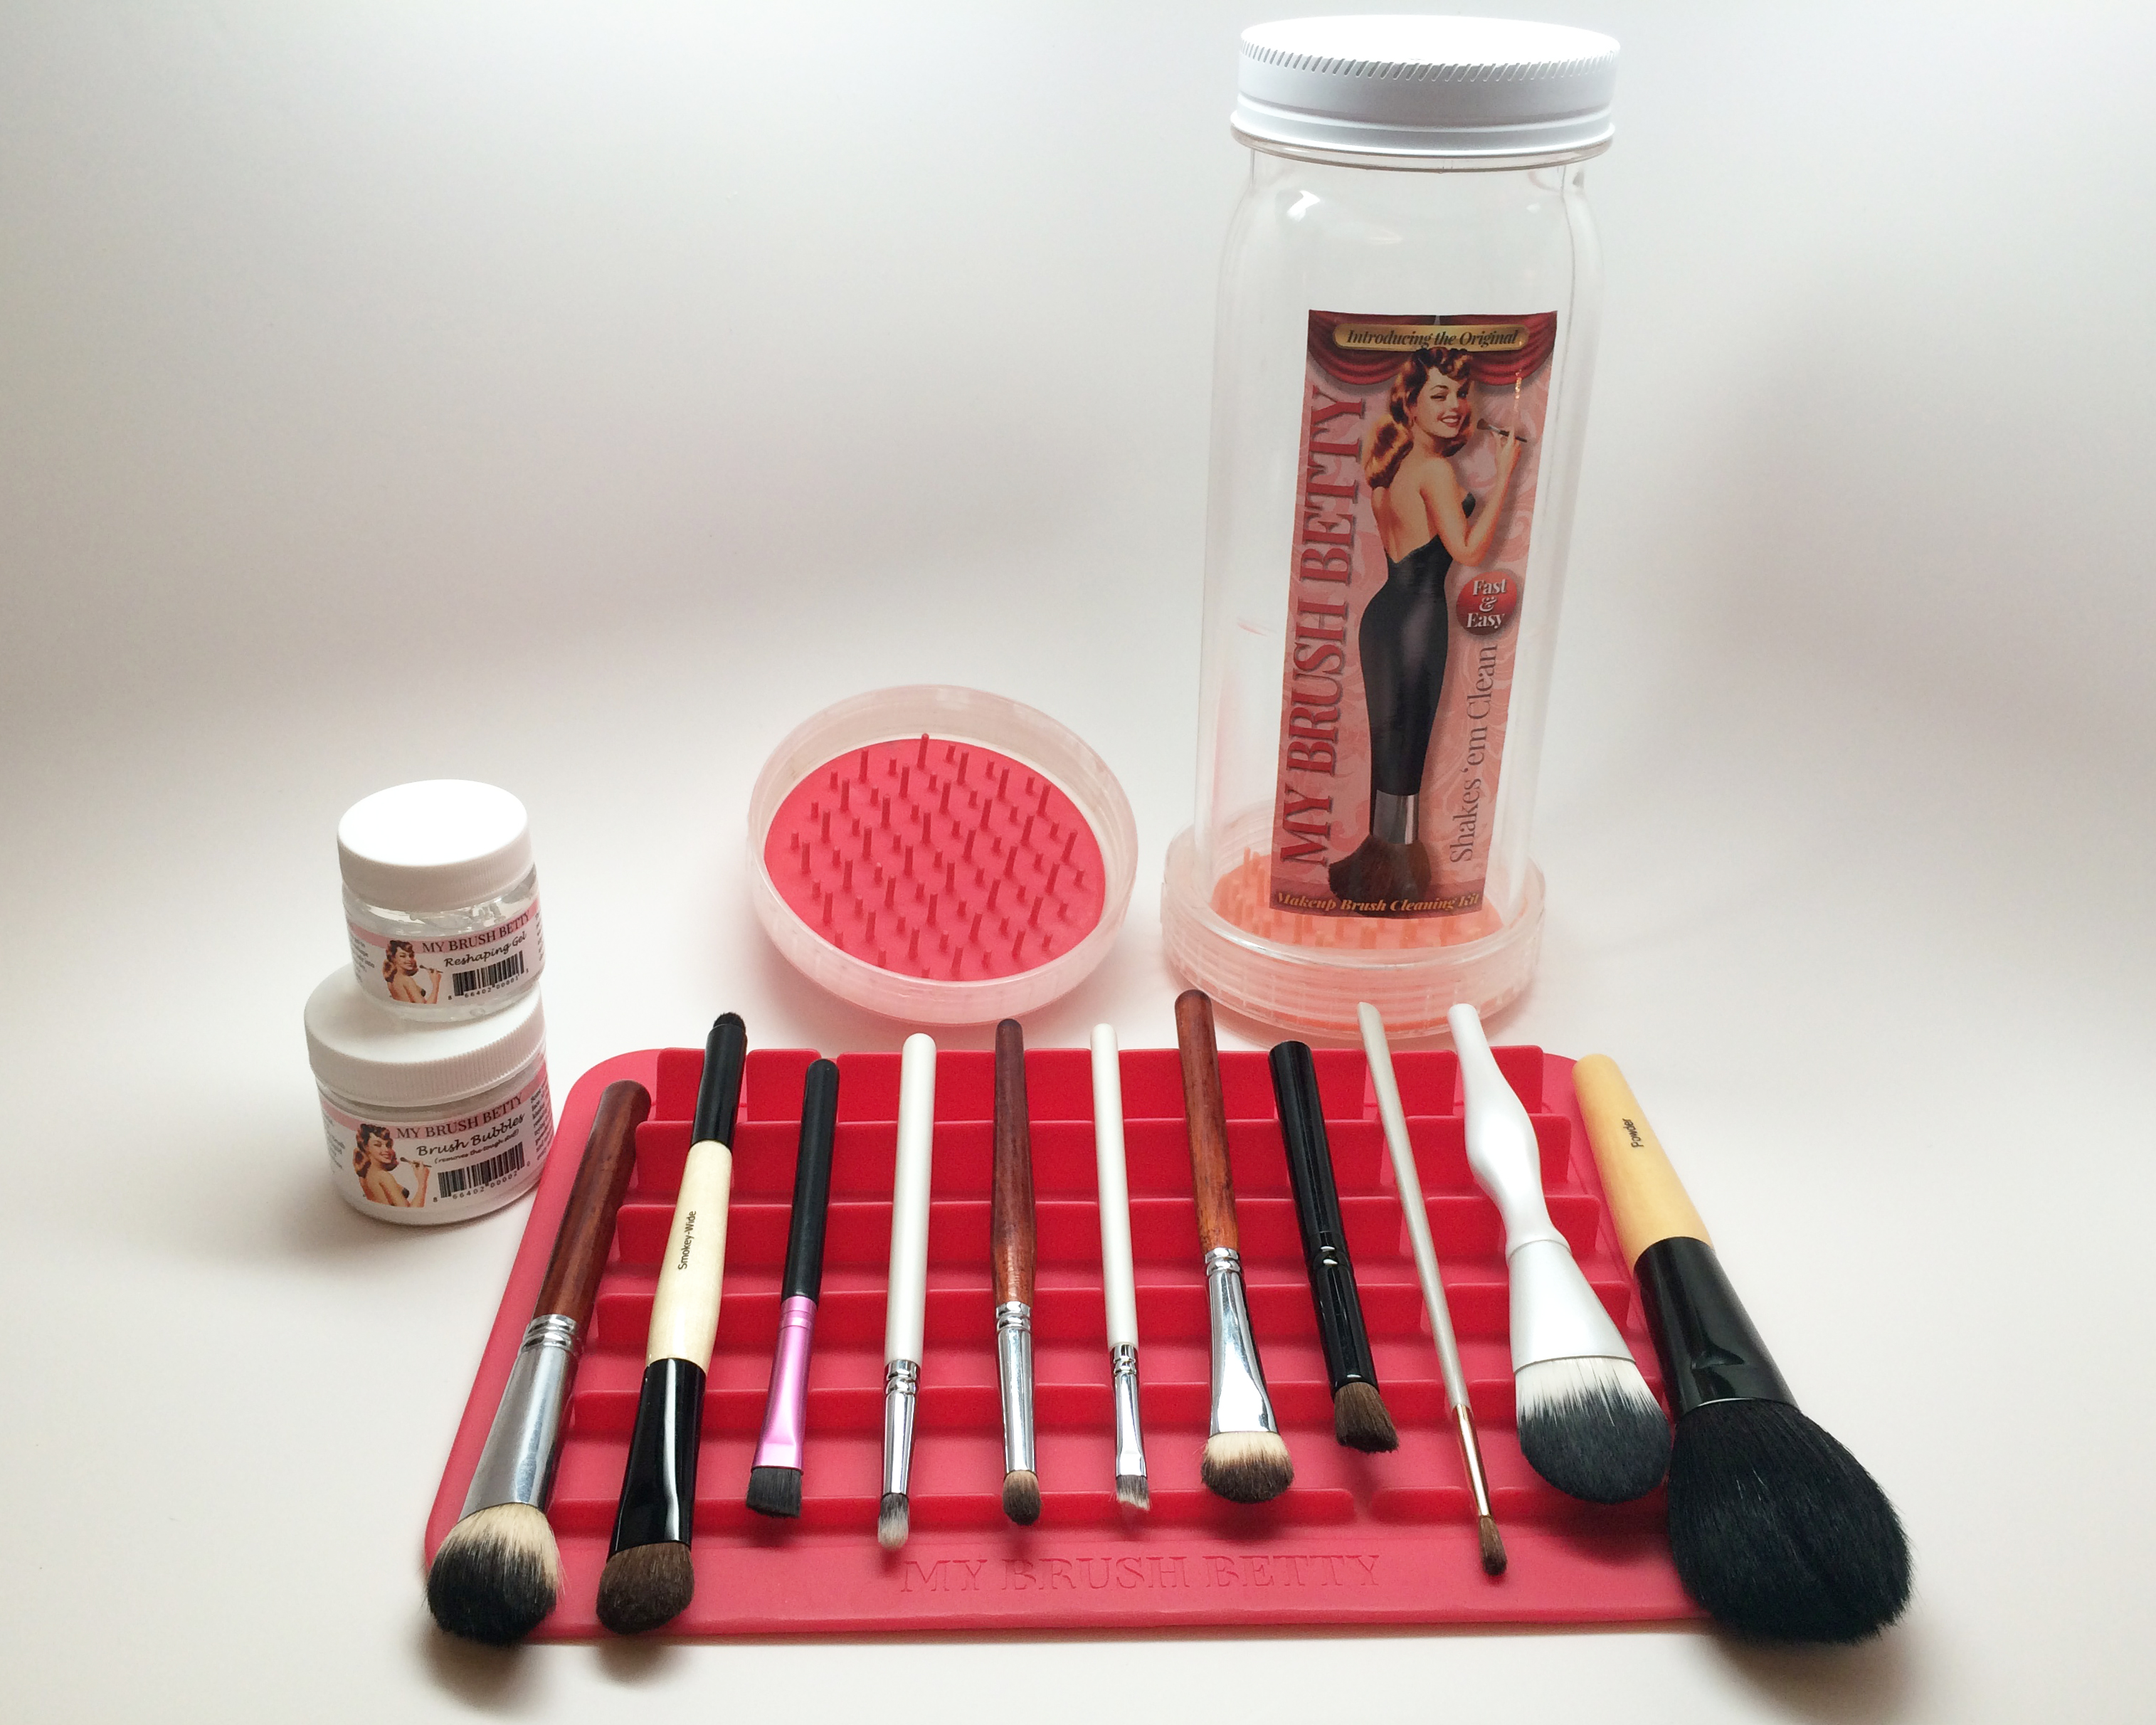
Ta-Da! Here is the purpose-built My Brush Betty Kit, with a lot of upgrades from my homemade brush-cleaning contraption.
